Set-up guide for DIC-23112 Wi-Fi Doorbell
Please follow below for a comprehensive guide on set up of the DIC-23112 Wi-Fi Doorbell.
Please read before installation:
- The DIC-23112 doesn't support a 5GHz network band, therefore your Wi-Fi network must be on a 2.4GHz frequency during set up. If you’re uncertain about this then please refer to the user manual of your router additionally you can contact your internet service provider.
- When following the steps below please have the DIC-23112 within 5m of where your router is located. Also the location where the DIC-23112 will be installed, ensure you have minimum 1Mb upload speed (The easiest way of doing so is using a internet speed test on a smart device such as Ookla,this it to be in the location while connected to your home network).
- In your smart device ensure the time setting is set to 24-hour format and not 12-hour format.
- For Android: If you’re using an Android smart device it might have Smart Switching enabled. Please turn this off. You can turn this back on after set-up is complete.
- Only use the power supply provided with the DIC-23112.
Installing the SD card - Always ensure the device is completely powered off before inserting or removing an SD card.
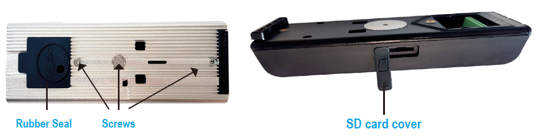
- Remove the rubber seal and 3 securing screws.
- Slide the DIC-23112 out of aluminium case.
- Open the SD card cover and insert SD card ensuring it’s fully inserted.
- Firmly push the SD card cover back in place.
- Slide the DIC-23112 back into the aluminium case, replace securing screws.
|
 |
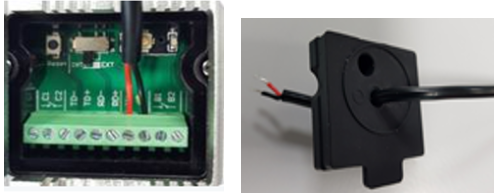
Connecting the power cable - Push the power cable through the rubber seal and wire the power cable into the terminal block.
- Connect the power cable to V+ and V- terminals (red cable to V+ and black to V-).
- Please ensure no bare cable is exposed, as it can cause an electrical short.
Please do not put the rubber seal back in place yet.
|  |
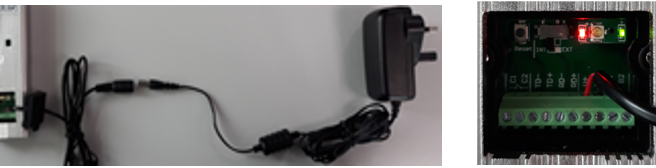
Powering up the DIC-23112 - First you must connect the power cable to a power supply, so plug it in and switch on.
- On the back of the device next to the power input there are two lights (see picture attached for reference) after 30+ seconds a red light will come on and stay steady. Also during this time a green light will start blinking, this is to indicate that the deice is ready for set up with your smart device.
|  |
Passwords
In the next section “Connecting the DIC-23112 with your smart device” you’ll be asked to enter 4 different passwords: - The first password 12345678 is the password for the Wi-Fi network of the DIC-23112 and you won't be asked to change this password.
- The default Security Code password 123456 is the security password for the DIC-23112 and you will be prompted to change this password to a password of your choice.
- The default Admin Password 123456 is to access the Advanced Settings of the DIC-23112. You will be prompted to change this password to a password of your choice.
- The fourth password you'll be asked to enter is the password of your router. Please have this ready to input when required. The DIC-23112 cannot connect to Wi-Fi that is not password protected.
|
Connecting the DIC-23112 with your smart device
Step 1: - Download the 'Smartwares View App' from Google Play / Apple app store.
- Allow all permissions to the device , this will allow the application to fully function.
|  |
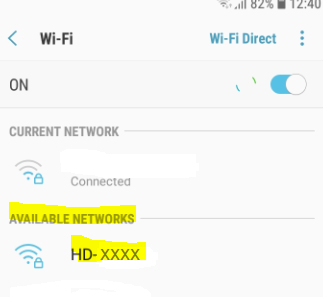
Step 2: - On your smart device go to Wi-Fi settings and search for Wi-Fi networks.
- A network with a name beginning HD-xxxxx will appear, please select this network as it is the independant WI-FI source of your doorbell.
- When prompted on joining the network enter the password 12345678 to connect / join.
- Remember to ignore any message that says internet may not be available.
| For example:
 |
Step 3: - Open the 'Smartwares View App'
- Tap on the
 to add a new system and a box will appear that you need to enter information into; to add a new system and a box will appear that you need to enter information into;
System Name - Enter a name of your choice for your DIC-23112.
DID - Enter your 'DID' code.
- The 'DID' is the Device ID of the DIC-23112 Doorbell. This is located on a QR code on the rear of the aluminium cover.
- You can manually enter the 'DID' or use your smart device to scan the QR code. For Android click on “Scan DID Label” and for iPhone/iPad tap on the symbol of a QR Code. ( please see attached pictures for reference between the two)
Security Code - Enter the Default Security Code 123456 and click on save / okay / save this system.
| For Android select “Scan DID Label”. For iPhone/iPad tap on the symbol of a QR Code: Location of DID code on rear of aluminium case: Location of DID code on rear of aluminium case:
 This image is for illustrative purpose only and is not your DID code. This image is for illustrative purpose only and is not your DID code. |
Step 4: - On your screen you will either see an image from the camera or a Wi-Fi symbol.
- Tap on the image or on the symbol (whichever has appeared) and you will be prompted to modify / change the default security code. Change this to a security code of your choice.
IMPORTANT: The set-up is not yet complete. Please follow all of the next steps. | 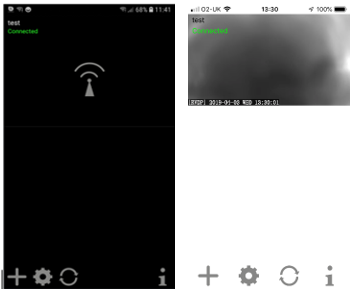 |
Step 5:
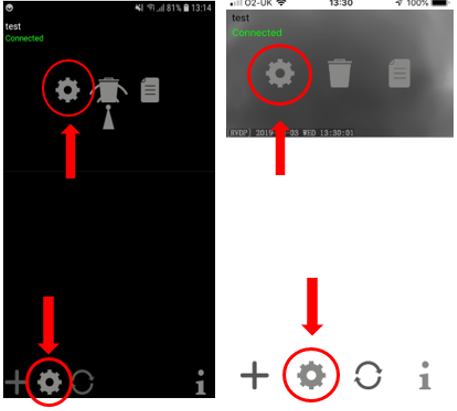
You need to access Advanced Settings to connect the DIC-23112 to your home network ,also to ensure that the correct time zone for your country is selected. - To enter Advanced Settings tap on the settings icon
 at the bottom of the screen. at the bottom of the screen. - This icon will appear again on top of the image. Tap on it again.
- In the next screen select ‘Advanced’ and enter the Admin Password 123456. You will be prompted to change this password to one personal to yourself.
|  |
Step 6:
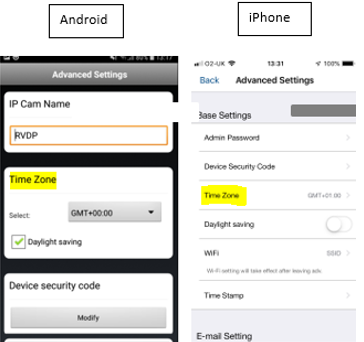
In Advanced Settings you need to set the correct Time Zone for your country. - Scroll through the menu options to 'Time Zone'.
- Select the Time Zone for your country (for example if you're in the UK please make sure that GMT+00:00 is selected and select 'Daylight Saving').
|  |
Step 7:
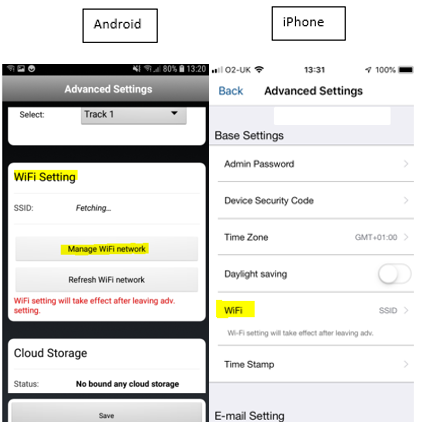
Setting up the DIC-23112 to your Wi-Fi network - In Advanced Settings scroll to 'Wi-Fi Setting' and either select your Wi-Fi network from the list (iPhone) or select 'Manage Wi-Fi network' (Android).
- Select your network from the list and enter the password of your Wi-Fi network.
- A message box will pop up to say unplug Ethernet cable. Please ignore this message as it has no relevance to the DIC-23112.
- Allow 2-3 minutes for the Doorbell to connect with your Wi-Fi.
- After 2-3 minutes close the app and press the Wi-Fi Doorbell button to test if it works.
|  |
For further instruction please consult the quick start guide included with your Wi-Fi Doorbell or download the full manual from the website:
https://www.smartwares.eu/en-gb/smartwares-products/doorentry/wifi-doorbells/smartwares-dic-23112-wi-fi-doorbell-wired-1080p-hd-dic--23112?returnurl=%2fen-gb%2fsearch%3fq%3ddic-23112
This solution is valid for model number DIC-23112 and DIC-23112UK
For product support:
Tel: 0345 230 1231 (Monday, Tuesday, Wednesday & Friday 10:00 - 16:00 and Thursday 12:30 - 16:00)
Email: technical.SL.UK@smartwaresgroup.com